These tips are for print design, whether it is printing a brochure, a poster or a business card. All of it requires careful preparation.
1. Remember to bleed
If any element on your layout makes contact with the document border you will have to use bleed. Bleed allows your printer to crop the image to its correct size.
Adobe InDesign
Standard measurement for the bleed in US is ⅛” or 3mm. Enter your bleed values in Marks and Bleed pane of the Print or Export PDF dialog box.
Bleed Settings in Photoshop
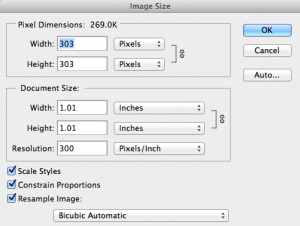
There are no bleed settings in Photoshop, however, you add bleed size to the document size. For example, if your final image is 300mm x 300mm you would add 3mm to the document size, making the image 306mm x 306mm.
2. Embed your fonts
If you are using a more eccentric font, you must embed the fonts directly into your document. That way you would prevent any substitutions which can occur if the print vendor doesn’t have your exact file.
3. Make sure your document is the correct size
Sending a small document intended for large print results in fuzzy and unclear printout. It is important to make sure your document is the same size as it would appear on print.

4. Proof your document thoroughly
Mistakes often cost money, or worse - damaged reputation. Proof your document for any punctuation, grammatical or semantic mistakes. Missing period or letter in an email address might make it impossible for the client to contact you.
5.Check your resolution
In order to get the best results in print, make the resolution of your images 300 DPI, the highest print resolution used by most vendors.
6. Convert your graphic to CMYK
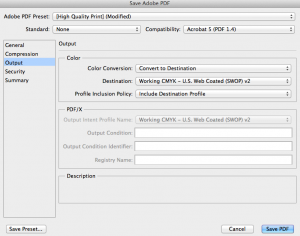
Photoshop uses RGB colors and InDesign uses CMYK. All you have to do is select the right ICC profile (color output) when you export the file. Export to PDF (Export -> Output -> Color Conversion & Destination) Choose the appropriate CMYK destination in the “Destination” menu, so that InDesign could convert all RGB images to CMYK.

